

I've received lots of emails asking me to explain drawing faces. Similar to "poses" the face is easiest to tackle from the front, head on. (No pun intended!) Three quarter and profiles are a little more difficult, so I'm only going to explain the front view for you now.
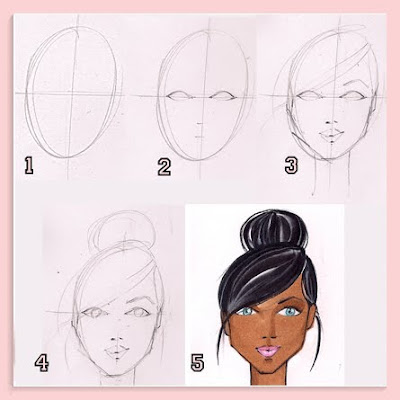
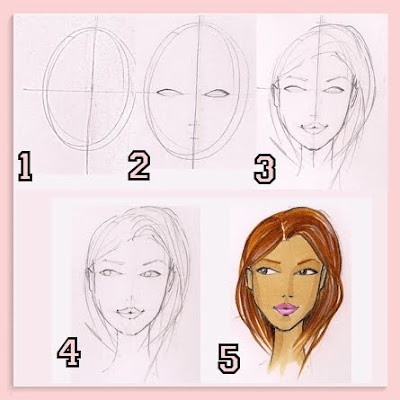
- You start by drawing an egg shape with lines up and down and side to side, both through the center.
- Halfway between the bottom and the center line you mark a dash for the nose, and halfway between the nose marking and bottom you mark a dash for the mouth. The eyes are drawn right across the center line. They're almond shape, and the space between them is equal to the width of one eye.
- Draw the hairline, the contour of the mouth and the eyebrows. This is also the time to contour the face. You can curve in at the eye line, the cheekbones, and shape the jaw line.
- Add the eye iris, the colored part of the eyeball. It should be a circle that is "cut off" by the eyelid and the the bottom lash. Having the iris "cutoff" is one of those details that makes the illustration more authentic and real looking as opposed to a floating dot of color surrounded by white.
- Color. First lightly erase all your lines. Then start by adding one coat of the chosen skin tone, then with the same marker draw the shadows on the upper eyelids, side(s) of the nose, top of chin, cheekbones and neck. Also apply color for hair (for previous tip on hair click here), eyes, and mouth. And polish off the sketch with colored pencils.
This is a very basic face. Of corse you can create a more unique face by angling or enlarging the eyes, or narrowing the mouth, or pulling it to one side to create a smirk. You can also play with the face contour and jaw to make a long and narrow face, or very angular face. The possibilities are endless. Like I suggested with poses, it also helps to have photos to reference.
If you have any questions on faces, please ask me in the comments section so that your question, and my answer, can be shared with everyone.


Thank you so much for these guides! I've long admired all these talented people who draw so well, while I'm still drawing stickmen. Now I have something new to practice on, heh. Thanks again!
Thanks for sharing these... Like Advo im learning and sketch things but nothing that really comes together. It has been getting better but yhea best thing are things like what you have posted here. :)
I go to work, I then not work so I can stalk your blog. Everyday. I really want to thank you for Tuesday Tips. It means so much to learn from such a talented artist. I just love your work so much! You truly are my inspiration :)
Awe, thank you ladies! It's my pleasure. I'm so glad your enjoying these posts. It's time consuming to work on them so it's so nice to read your feedback and feel like its worth it. =)
these tuesday tips are FABULOUS - thank you so much for sharing your knowledge with the blog world! i'd be interested to know what happens to your illustrations after you've drawn them - do you have recommendations for scanners and computer programs to get these beauties from paper to digital? any tips for printing illustrations? i love designing cards and invitations for friends and family, but i've always been mystified as to how one gets them from the page into the computer and out again en masse...i'd love to hear any advice you have that you're willing to share with those less computer-literate among us :)
My current scanner is terrible, its a all-in-one from HP and I really do not like it. I used to have a great scanner in my old office, maybe I'll email someone and ask them to go see the make and model of it, so I can share with you. Because my scanner is so crappy I often have to pull my sketches into photoshop and adjust the levels or curve to retouch the color or remove the background. (see how bad the scans are on the 1-2-3 images I posted in this post, that's because I didn't retouch them at all and was in a rush to get this posted.
My printer on the other hand is fantastic! It was a big splurge but well worth it. It's an Epson Stylus 1900. Not only was the printer very pricey but the inks cost about $100 for all 9 cartridges which it needs to run. But the outcome is fantastic, people email me all the time after receiving my prints to tell me how impressively crisp and clear the prints are.
thanks so much for sharing, brooke!
thanks for the tip! I struggle with drawing cartoon people (I prefer drawing animals :))) and your tip's really useful :)
Post a Comment